In a static IP configuration, an onboard network device is assigned an IP address that can be accessed directly from the Internet. It does not receive an IP address from the ICM.
Important! |
You should only assign a static IP address to a secure device, such as a firewall router. |
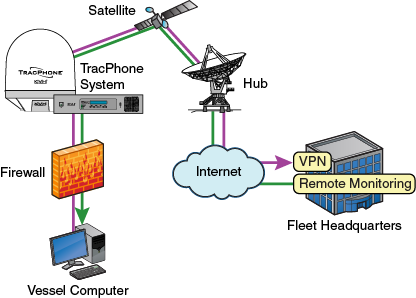
A static IP connection is commonly used by commercial vessels to enable remote monitoring and IT management from shore, and to allow a vessel’s crew to access their company’s secure VPN (virtual private network).
Common Static IP Applications
To set up the network in a static IP configuration, follow these steps:
Make sure the system is activated for mini-VSAT Broadband service.
Turn on the TracPhone system and make sure it is “Online.” The system must remain online to allow KVH to set up your system over the satellite link.
Fill out the online form at www.kvh.com/staticip [Internet access required - airtime charges may apply]. Be sure to read all of the details on this form. An additional monthly fee for static IP service will apply.
Important! |
Only the “User Ethernet 4” port on the ICM can be used to connect static IP devices, as this port bypasses the ICM’s local subnet to connect directly to the built-in modem. |
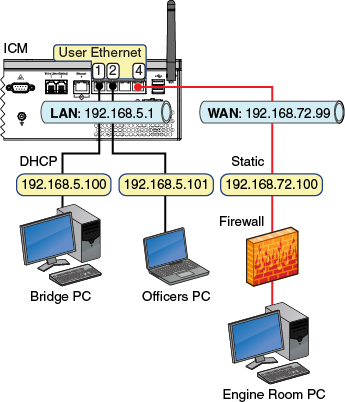
Connect your network device or computer to the “User Ethernet 4” port on the rear panel of the ICM. Use a straight-through CAT5 (or better) Ethernet cable with RJ45 connectors.
Static Configuration Wiring Example
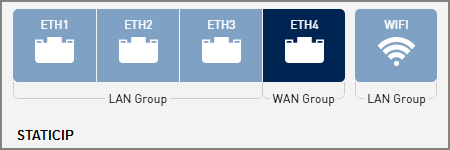
At the TracPhone V11-IP web interface or myKVH web portal, select the Static IP network configuration. Refer to Selecting a Network Configuration for details.
Static IP Configuration
NOTE: As an alternative, if you also need to control user access to the Internet, you can select the Crew-4 configuration instead. See Crew Configurations for details.
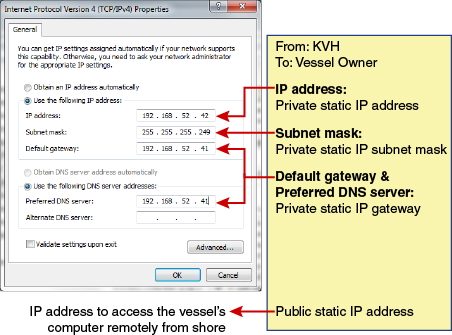
When you receive an email from KVH confirming that your static IP address has been set up, configure the TCP/IP properties of your network device or computer with the static IP data provided in the email. For details on accessing your computer’s TCP/IP properties, refer to Configuring Computers for DHCP.
Static IP Data
Connect all other (non-static IP) computers and/or network devices to “User Ethernet” ports 1-3 on the rear panel of the ICM. For example, you might wish to add an external WAP (or Wi-Fi router configured for bridge mode) to supplement Wi-Fi access. Use straight-through 100 Mbps fast Ethernet UTP CAT5 cables (or better) with RJ45 connectors.
To enable the ICM’s built-in wireless access point (WAP) for Wi-Fi access, follow the steps in Wireless Settings.
Make sure all non-static IP computers are configured for DHCP addressing (see Configuring Computers for DHCP). Devices connected to “User Ethernet” ports 1-3 and Wi-Fi will receive IP addresses from the ICM via DHCP. The ICM serves as a router.
NOTE: By default, the ICM has a gateway of 192.168.5.1 and assigns IP addresses in the 192.168.5.100-200 range. If this configuration conflicts with an existing onboard network, you may change the settings at the TracPhone V11-IP web interface (go to Settings > Network Settings). See LAN Settings on ICM for details.