Tracking Avoidance Zones
In an ideal installation, the antenna has a clear view of the sky in all directions and no other radiating equipment is nearby that can interfere with the satellite signal. However, such an ideal installation is not always achievable on a vessel, particularly on smaller yachts. Therefore, the system allows you to configure up to five tracking avoidance zones for areas where there may be blockage or RF interference causing marginal VSAT reception and intermittent antenna performance.
Whenever the antenna is tracking a satellite in the direction of a tracking avoidance zone, it will switch to a different satellite if one is available. An allowance period (1-60 minutes, selectable) precludes switching in cases when the antenna is simply passing through a zone while the vessel is turning. The system calculates how long the antenna will be pointing in the zone based on the vessel’s rate of turn. If the calculated time exceeds the allowance period, the antenna will immediately switch satellites, as long as there is an alternate satellite available in your service region.
Passing Through a Tracking Avoidance Zone (Example)
Setting Up Tracking Avoidance Zones
To manually configure a tracking avoidance zone, follow these steps.
IMPORTANT! KVH actively monitors your antenna system’s performance and will configure a tracking avoidance zone over the air whenever an obvious blockage area is identified. Therefore, setting up zones yourself on the vessel is unnecessary in most cases.
Step 1 - Identify the Azimuth Range
First, you need to determine the necessary azimuth range for the tracking avoidance zone(s). You will need to enter, in clockwise order, the beginning and ending azimuths that define the outer boundaries of the zone, relative to the antenna’s forward arrow, which should be pointing toward the bow.
Note: Each tracking avoidance zone must span at least 5º. Therefore, be sure to set beginning and ending azimuths at least 5º apart.
Step 2 - Identify the Elevation Range
Now you need to determine the necessary elevation range for the tracking avoidance zone(s). You will need to enter, in ascending order, the beginning and ending elevations that define the outer boundaries of the zone.
Note: Each tracking avoidance zone must span at least 5º. Therefore, be sure to set beginning and ending elevations at least 5º apart.
Step 3 - Configure the Tracking Avoidance Zone(s) at the Web Interface
- At either the system's web interface or KVH Manager, go to the Tracking Avoidance Zones page.
- Select.
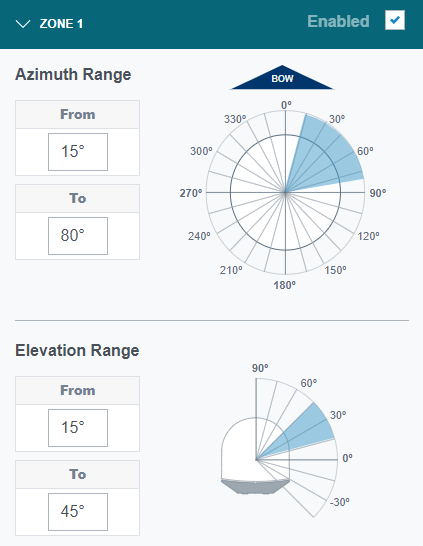
- Enter the azimuth and elevation ranges for Zone 1. Then select the check box.
- If you wish to set up another tracking avoidance zone, select a zone from the drop-down menu and repeat step 3 for the selected zone.
- In the Time in Zone box, enter the maximum number of minutes (between 1 and 60) during which the antenna will be allowed to track within a tracking avoidance zone.
- Select .
Example of a Configured Tracking Avoidance Zone

Disabling Tracking Avoidance Zones
You can disable any of your programmed tracking avoidance zones to temporarily remove its restrictions on tracking. This function permits the antenna to ignore the zone(s); it does not delete them from the system’s memory.
To disable a tracking avoidance zone, follow these steps:
- At the System's web interface or KVH Manager, go to the Tracking Avoidance Zones page.
- Select.
- Select the zone you want to disable from the drop-down menu.
- Clear the check box. The zone disappears from the Cumulative View.
- Select .
Clearing Tracking Avoidance Zones
You can clear all tracking avoidance zones from the system’s memory. Unlike disabling zones, clearing zones permanently deletes them.
To clear the tracking avoidance zones, follow these steps:
- At the system's web interface or KVH Manager, go to the Tracking Avoidance Zones page.
- Select .
- Select .
- At the confirmation message, select .
Was this topic helpful? Please share your feedback.
© 2024, KVH Industries, Inc., All rights reserved.

