KVH API
IMPORTANT! KVH API is available only to authorized users on the account by request. See Step 1 below.
KVH API allows you to access API data such as terminal status and usage, as well as available telemetry data. It also allows you to reboot the antenna, change Wi-Fi settings, and opt in/out of overage.
Note: KVH API calls are rate-limited to 300 requests per minute for a single user. Peak data accuracy is achieved at an update frequency of once every ten minutes. Faster rates will not produce better information, as most data sources themselves do not report more frequently than once every ten minutes.
Getting Started
Before your designated users can start using the KVH API, the following essential steps must be completed.
Step 1: Request API Permissions
Contact KVH’s Airtime Services Department and ask them to apply API ACCESS permission to your account. If you have multiple accounts, choose the highest-level account in your account hierarchy that contains all the sub-accounts and terminals that you want to access via the API. The API ACCESS permission is inherited by all its child accounts.
In addition, request the following permission levels for each KVH Manager user that you would like to grant access to the API:
- API USER
- FLEET ADMIN
Provide KVH with the email address for each designated user. For example, if you manage multiple sub-accounts, one for each of your customers, you might grant API permissions to the manager of each sub-account.
IMPORTANT! Each designated user must already be an authorized user for their account or sub-account(s) in KVH Manager. Users will only have API access to the terminals associated with those accounts.
Step 2: Identify the Account ID and Terminal ID(s)
To make an API request to an account or terminal, you will need its Salesforce account ID or terminal ID, respectively. You can find the account ID in your web browser's address bar when you select the account in KVH Manager.
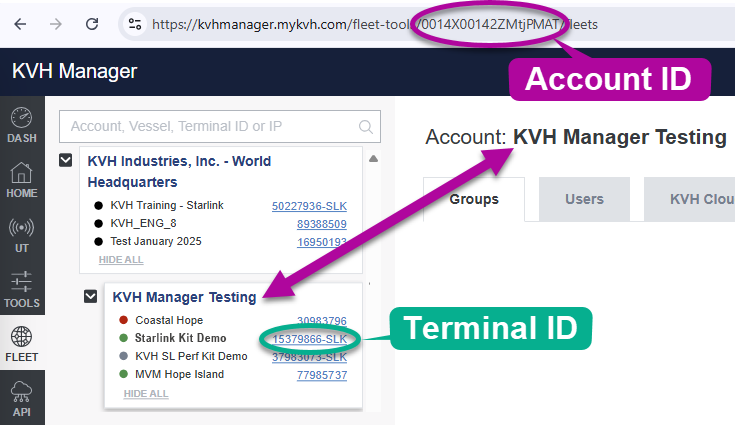
Note: If you know the top-level account ID, you can use the API to view all of its sub-account IDs and all of the terminals associated with them. See below for details.
Step 3: Generate API Credentials
Once your designated user(s) have API permissions, they will have access to the KVH API page the next time they log into KVH Manager. Each user must then follow these steps to generate their own unique API access keys:
- Go to the KVH API page of KVH Manager.
- Select . These consist of a Client ID (user's email address) and a Client Secret.
- Copy and paste the Client Secret to a text editor, such as Notepad, for later use.
IMPORTANT! Do not share your Client Secret with anyone, as it is confidential and can be used to generate access tokens for retrieving sensitive account information, such as terminal usage.
Step 4: Request Access Token(s)
Now each designated user can apply their unique Client ID and Client Secret to request access tokens for their associated account/sub-account(s) and terminals. Each account or terminal requires a unique access token to authorize access to its data. To request an access token, enter the following sample curl command into a shell script program such as Bash, making sure to replace the Client ID and Client Secret with your credentials, and the scope with your account ID or terminal (asset) ID:
curl -sSL 'https://mapi.mykvh.com/oauth/token' \
--header 'Content-Type: application/json' \
--data '{
"client_id": "",
"client_secret": "",
"audience": "https://api.mykvh.com",
"grant_type": "jwt_bearer",
"scope": "account#" OR "asset#"
}'
The above curl command will return the following sample payload, containing your access token for that account or terminal (asset):
{
"access_token":"",
"scope": "account#", OR "asset#",
"expires in": 3600,
"token_type": Bearer"
}
Note: Access tokens are valid for up to one hour. If your access token expires, repeat the steps above to request a new one.
Step 5: Exercise the API
Your designated users now have everything they need to use the KVH API. Before writing any code to integrate it into your application, exercise the API using KVH's Swagger interface at https://api.mykvh.com/v3/docs/ following the steps below.
IMPORTANT! You will need to enter the unique access token for the requested terminal.
Viewing Terminal Usage Data
To view terminal usage data, follow these steps:
- Go to https://api.mykvh.com/v3/docs/.
- Select in the upper-right corner of the page and enter your access token for the terminal.
- Select .
- Enter your terminal ID and select .
Interpreting Terminal Usage Data
The following key information is included in the KVH API terminal usage payload:
- Plan: Name of data plan and its associated data allowance
- Traffic ID: Traffic identifier used internally by KVH
- Allowance: Prorated or full allowance of data plan
- Overage: Data usage outside of allowance for current billing cycle (always 0 if unlimited); Opt-In or Opt-Out
- Usage: Current data usage
- Service Code: Billing code associated with terminal type (Starlink only)
Note: Refer to the table below for a more detailed description of service codes.
Service Code Definitions (Starlink Only)
| Service code | terminal Type |
| SLK | Starlink (Priority, Rated) |
| SLO | Starlink (Non-Priority Free Overage) |
| SLP | Starlink (Priority, Unrated) |
| SLD | Starlink (Priority Data Block, Rated) |
Note: Service codes are subject to change without notice.
Viewing Terminal Status Data
To view terminal status data, follow these steps:
- Go to https://api.mykvh.com/v3/docs/.
- Select in the upper-right corner of the page and enter your access token for the terminal.
- Select .
- Enter your terminal ID and select .
Interpreting Terminal Status Data
The following key information is included in the KVH API terminal status payload:
- Latitude and Longitude: Vessel's current position
- Heading: Vessel's current heading (null if unavailable)
- Alerts: Any active system errors or warnings
- Uptime in seconds: Length of time system has been online since it was booted
- System type: Type of terminal (STARLINK, or UNDEFINED if not given)
- Kit number: Starlink system (KIT) serial number
- Device ID: Starlink terminal ID
- Service line ID: Starlink service line ID (associates a service address and a subscription)
- Availability: See chart below
Terminal Availability Status Definitions
| status | description |
| Online | Last update < 2 hours (< 1 hour for Iridium terminals) |
| Available | Last update < 24 hours (only visible for Iridium terminals) |
| Offline | Last update < 48 hours (< 24 hours for Iridium terminals) |
| Aged | Last update < 30 days |
| Unknown | Not known |
Viewing Telemetry Data
To view the Starlink telemetry data available for a given terminal, follow these steps:
- Go to https://api.mykvh.com/v3/docs/.
- Select in the upper-right corner of the page and enter your access token for the terminal.
- Select .
- Enter your terminal ID.
- Enter the start and end UNIX timestamps for the desired time period within the past 30 days.
- Select the desired telemetry metric (see list below).
- Select .
Note: Telemetry information is only reported during periods when system is online and data is being transferred.
Interpreting Telemetry Data
The following key telemetry information is available:
- Downlink Throughput: Average download speed
- Uplink Throughput: Average upload speed
- Latency: Average latency measured to the Starlink point of presence (POP)
- Ping Drop Rate: Percentage of pings that have dropped
- Signal Quality: Signal to noise ratio (SNR) expressed as a percent from 0 dB to 10 dB
- Obstruction: Percent of time the antenna is obstructed
The following elements are included for each telemetry object:
Definitions of Telemetry Elements
| Field | description |
| Scope | Telemetry object (see above) |
| Min | Minimum recorded value in requested time period |
| Max | Maximum recorded value in requested time period |
| Last | Last recorded value in requested time period |
| Unit | Units in which reported values are measured (e.g., bps, ms, or percent) |
| Fixed parts | Average values reported in 14-minute intervals spanning the requested time period |
Retrieving Terminal IDs from Account Information
IMPORTANT! You will need to enter the unique access token for the requested account.
KVH API enables you to automate the creation of a terminal ID list. Start by retrieving the sub-account IDs from the top-level account, then use these IDs to view additional sub-account IDs. You can then use these sub-account IDs to generate a list of associated terminal IDs.
Follow these steps to generate a list of sub-accounts:
- Go to https://api.mykvh.com/v3/docs/.
- Select in the upper-right corner of the page and enter your access token for the account.
- Select .
- Enter your top-level account ID and select .
- Repeat steps 1-4 for each sub-account to view additional sub-accounts.
Follow these steps to generate a list of terminals associated with a sub-account:
- Go to https://api.mykvh.com/v3/docs/.
- Select in the upper-right corner of the page and enter your access token for the account.
- Select .
- Enter your account ID and select .
Retrieving Device IDs from a Terminal
Follow these steps to generate a list of devices (e.g., antenna unit and Wi-Fi router) that are associated with a Starlink terminal.
- Go to https://api.mykvh.com/v3/docs/.
- Select in the upper-right corner of the page and enter your access token for the terminal.
- Select .
- Enter your terminal ID.
- Select .
The following information is provided for each device associated with the terminal:
- ID: Device ID
- Terminal ID: Terminal ID
- Updated at: Date and time of last update received from the device
- Type: Type of device (Unit = antenna unit; Router = Wi-Fi router)
- Availability: See chart below
Device Availability Status Definitions
| status | description |
| Online | Last update < 2 hours |
| Offline | Last update < 48 hours |
| Aged | Last update < 30 days |
| Unknown | Not known |
Opting In/Out of Priority Overage or Automatic Top-Ups
IMPORTANT! This command only works on supported devices and monthly data plans.
Follow these steps to opt in or out of Priority Overage or automatic top-ups (depending on data plan), which applies after the plan's monthly data allowance is consumed. See Data Usage for details.
- Go to https://api.mykvh.com/v3/docs/.
- Select in the upper-right corner of the page and enter your access token for the terminal.
- Select .
- Enter your terminal ID.
- Edit the "enabled" value. To opt in, enter "true." To opt out, enter "false."
- Select .
A curl command is sent and a unique job ID for the OptIn command is provided. To view its status, initiate a Jobs command.
IMPORTANT! You must wait at least 5 minutes after sending a POST or PUT command before sending another POST or PUT command to the same terminal. Any additional commands received within this 5-minute period are discarded.
Rebooting the Starlink System
Follow these steps to reboot a Starlink antenna system via the API.
- Go to https://api.mykvh.com/v3/docs/.
- Select in the upper-right corner of the page and enter your access token for the terminal.
- Select .
- Enter the device ID for the Starlink unit.
- Enter the terminal ID.
- Select .
A curl command is sent and a unique job ID for the Reboot command is provided. To view its status, initiate a Jobs command.
IMPORTANT! You must wait at least 5 minutes after sending a POST or PUT command before sending another POST or PUT command to the same terminal. Any additional commands received within this 5-minute period are discarded.
Wi-Fi Settings
You can view or change the following settings of a terminal's Starlink Wi-Fi router:
| setting | description |
| SSID | Name assigned to the router's Wi-Fi network |
| Password | Password required for users to access the Wi-Fi network |
| Enabled | True = Built-in Wi-Fi is On False = Built-in Wi-Fi is Off |
Viewing the Wi-Fi Settings
Follow these steps to view the current Wi-Fi settings.
- Go to https://api.mykvh.com/v3/docs/.
- Select in the upper-right corner of the page and enter your access token for the terminal.
- Select .
- Enter the router's device ID.
- Enter the terminal ID.
- Select .
Change Wi-Fi Settings
Follow these steps to change the Wi-Fi settings via the API.
IMPORTANT! You will need to provide a value for all three Wi-Fi settings, even if you need to change just one of them. Enter the current value for any setting you do not wish to change.
- Go to https://api.mykvh.com/v3/docs/.
- Select in the upper-right corner of the page and enter your access token for the terminal.
- Select .
- Enter the router's device ID.
- Enter your terminal ID.
- Edit the values of all three fields (see above). A value must be entered for each setting.
- Select .
A curl command is sent and a unique job ID for the Wi-Fi command is provided. To view its status, initiate a Jobs command.
IMPORTANT! You must wait at least 5 minutes after sending a POST or PUT command before sending another POST or PUT command to the same terminal. Any additional commands received within this 5-minute period are discarded.
Checking the Status of a Command
Follow these steps to check the current status of a command you sent.
- Go to https://api.mykvh.com/v3/docs/.
- Select in the upper-right corner of the page and enter your access token for the terminal.
- Select .
- Enter the command's job ID.
- Select .
The following information is provided :
- Job ID: Job ID
- Job Type: Type of command
- User ID: User ID of the person who initiated the command
- Status: See chart below
- Created at: Date and time the command was initiated
- Updated at: Date and time of this status update
Job Status Definitions
| status | description |
| Pending | Command is being processed |
| Success | Command has successfully completed |
| Failed | Command failed |
![]()
Was this topic helpful? Please share your feedback.
© 2024-2025, KVH Industries, Inc., All rights reserved.