The crew configurations allow you to control user access to the system’s Internet connection. Each crew configuration has certain “User Ethernet” ports (and possibly Wi-Fi) designated as “user login required.” Users who connect to the system via one of these “Crew LAN” ports (or Wi-Fi) will be required to enter their user name and password to access the Internet. Once a user has consumed his/her data allotment for the current time period, access to the system is denied until the next time period begins and the user’s full allotment is restored. The “Ops LAN” ports, if any, provide direct Internet access without a user login. There are four basic crew configuration options available out of the box, as explained below.
Ethernet Ports |
Internet Access |
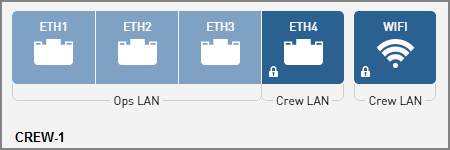
1, 2, and 3 |
Unrestricted (Ops LAN) |
4 and Wi-Fi |
User login required (Crew LAN) |
Crew-1 Configuration Diagram
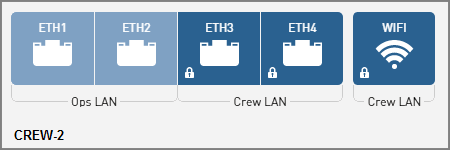
Ethernet Ports |
Internet Access |
1 and 2 |
Unrestricted (Ops LAN) |
3, 4, and Wi-Fi |
User login required (Crew LAN) |
Crew-2 Configuration Diagram
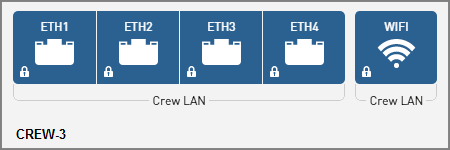
Ethernet Ports |
Internet Access |
1, 2, 3, 4, and Wi-Fi |
User login required (Crew LAN) |
Crew-3 Configuration Diagram
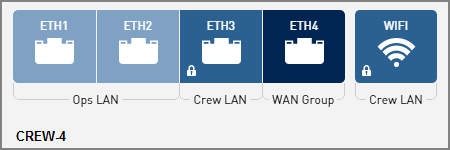
Ethernet Ports |
Internet Access |
1 and 2 |
Unrestricted (Ops LAN) |
3 and Wi-Fi |
User login required (Crew LAN) |
4 |
Static IP (WAN) |
NOTE: See Static IP Configuration for details about static IP and its additional setup steps.
Crew-4 Configuration Diagram
To set up the network in a crew configuration, follow these steps:
At the TracPhone V11-IP web interface or myKVH web portal, select the desired Crew network configuration. Refer to Selecting a Network Configuration for details.
Connect the Crew computers and/or network devices to the “User Ethernet ports” on the ICM that are designated “Crew LAN.” Use straight-through 100 Mbps fast Ethernet UTP CAT5 cables (or better) with RJ45 connectors.
Connect the Operations computers and/or network devices to the “User Ethernet” ports on the ICM that are designated “Ops LAN,” if any.
Crew-2 Configuration Wiring Example
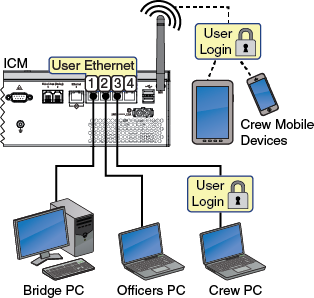
To enable the ICM’s built-in wireless access point (WAP) for Wi-Fi access, follow the steps in Wireless Settings.
Make sure all computers are configured for DHCP addressing (see Configuring Computers for DHCP). Devices connected to the ICM (via Ethernet cables or Wi-Fi) will receive IP addresses from the ICM via DHCP. The ICM serves as a router.
If you selected the Crew-4 configuration, connect your static IP device to “User Ethernet” port 4 and follow the additional setup steps explained in Static IP Configuration.
NOTE: By default, the ICM has a gateway of 192.168.5.1 and assigns IP addresses in the 192.168.5.100-200 range. If this configuration conflicts with an existing onboard network, you may change the settings at the TracPhone V11-IP web interface (go to Settings > Network Settings). See LAN Settings on ICM for details.
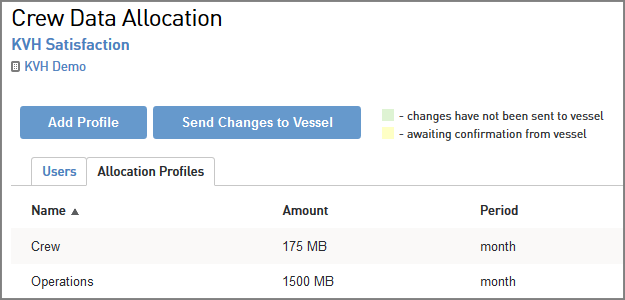
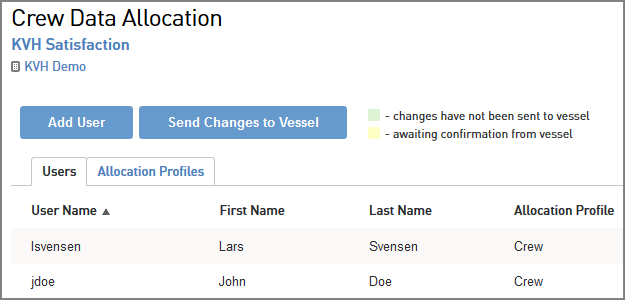
Set up all of the user names and passwords, as well as daily, weekly, or monthly data allocations for each user, at the myKVH web portal (www.mykvh.com). Go to the Terminal > Data Plan section of the Vessel Details page and select Crew Data Allocation.
myKVH Crew Data Allocation: Users (Example)
myKVH Crew Data Allocation: Allocation Profiles (Example)